
| Introduction |
| If you're familiar with the conversion for Freespace 2 found on another section of this webpage, and also previously featured in various issues of both Babcom and the Great Machine, you will know the vast majority of the rules presented below. Aside from some general re-wording the rules have remained the same. If there are any changes or additions, this will be presented in red so as to better stand out. If you have found any problems or questions with these rules, feel free to ask me any questions through email. |
| Fighter Organisation and Deployment |
 |
Because of the nature of the Freespace computer game, fighters tend to have greater focus and firepower due to the fact that Freespace is after all, a flight simulator. This is especially true in Freespace 1 where the Capital Ships lack beam weapons and are quite impotent compared to B5Wars standards. As such, fighters under the conversion rules undergo some changes as follows.
|
| Shields and Countermeasures |
|
|
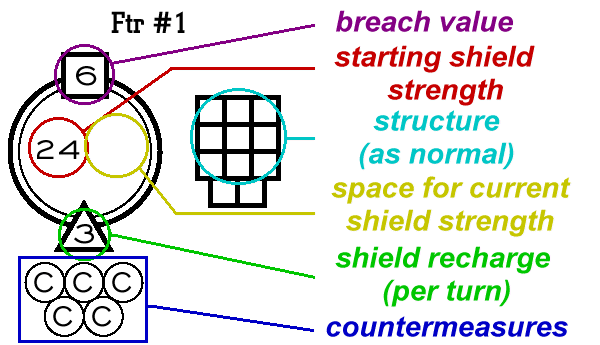
The Freespace shields differ from anything previously seen in B5Wars or any of its conversions. As such, they require a bit of explanation. Beside the structure for an individual fighter, there will also be a shield diagram. This diagram has three numbers associated with it, Shield Strength, Breach Value and Recharge Rate. Shield Strength - This value represents the overall strength of the shield. Each time a shield absorbs damage, the amount of damage absorb is subtracted from this total. When the value reaches zero, all damage will hit the fighter instead. Breach Value - This represents the maximum amount of damage that the shield can absorb from any one attack. Typically, this value equals one quarter of the shield strength. When a fighter is hit, an amount of damage equal to the breach value is absorbed by the shield, the remaining damage is applied against the fighter. Some weapons are noted as not breaching fighter shields, in this case, all damage from the weapon is applied against the shield. Recharge Rate - During the power allocation segment, each shield will regain an amount of strength equal to this value and up to the shields starting level. This value may be increased if desired, as noted on the fighter's SCS Example of Taking Damage: In a crazy crossover battle a Hercules MK2 is hit by a Twin Array from a Primus Battlecruiser. The TA hits the fighter's port for 12 damage. The Hercules with full shields, takes 6 points to her shields (the breach value) while the remaining 6 points hits the fighter's structure. Two damage is absorbed by armour, and the remaining 4 damage is marked off the structure box. At the end of the turn, the fighter has 18 shields and 4 structure damage. Countermeasures: Countermeasures represent anti-missile equipment such as chaff, flares and the like. Each fighter is equipped with a set number of counter measures that can be used against any ballistic weapons attacking the fighter flight. The flight may use as many counter measures as it desires per turn, as long as the usage is spread throughout the fighter flight. Note that Freespace 1 Counter-measures are less-effective, and thus only confer a -3 intercept bonus rather than the -4 found in the FS2 Conversions. |
| Squadron Tracking Data |
 |
On the first page of most Destroyer SCSes, you will fill little boxes like the one above. These boxes are used for the player to right down and record what squadrons are aboard his/her Destroyer, above is an example of a filled out one. These don't really serve any in-game function, they are included mainly to fill the space of a mostly blank page, and to provide anyone wishing to run these ships in a campaign with the ability to track what fighters are assigned to the ship. Unless someone has a better idea for what to put on the first page of the SCS (aside from variants, which I've already done), I'll probably continue doing this. |
| General Rules: |
| Slow Ballistics: Slow Ballistics represent guided weaponry which is far slower than your typical ship-launched missile. In Freespace terms, a Slow Ballistic is any weapon with the 'bomb' flag, meaning it can be targeted by the player and shot down in mid-flight. Slow Ballistics follow all rules associated with standard Ballistics with two exceptions. First, they do not impact during the ballistic impact phase. Rather due to their slow nature, a slow ballistic will impact during the fighter attack ships phase (the last phase of combat). Also, if using the fighter missions found in Showdowns-2, a flight on the defensive intercept mission may intercept slow Ballistics as long as they are within one hex of the line of fire from the launch to the impact hex. This is in lieu of the requirement of being in the same ship as the target hex. Multiple-Bank Firing: Instead of using one or two large secondary banks, some bombers rely on multiple smaller banks to hold their missile or bomb loads. As a result, one might have a bomber with four banks but only one anti-capital bomb in each. If this is the case, an exception to the single-rack firing rules may be used. If a bomber/fighter has one or more banks, and can only hold one ballistic in each, then multiple banks carrying the same type of ordanance may be used to fire up to standard maximum of two missiles. For example, if a bomber has one Harbinger in Bank B and in Bank C, both bombs may be fired in the same turn. |
Aspect Locks: Some fighter-launched weapons, notably bombs, require an aspect lock in order to fire. This lock represents the increased time required for the guidance systems to gain a lock on the target. Any such weapon will have two ranges, a lock range and a launch range. When a fighter wishes to fire an aspect lock weapon, they must first declare their intentional to gain an aspect lock. This is done during the ballistic launch phase, as long as they are within the lock range and the desired target is within. While acquiring a lock, the fighter may not jink, or fire any weapons save independent turrets. At the end of the turn, assuming the target is still in arc, the fighter has acquired a lock. Next turn, assuming the fighter is now within launch range, it may fire its weapons and otherwise act as normal for the remainder of that turn. If a fighter is unable to get close enough to launch their ordinance, an aspect lock may carry over several turns as long as the target remains in arc. |
Subspace Drives: These act nearly identical to B5 jump drives except that all units have them, and no unit can enter another units vortex, or jump point. There are two main differences to keep in mind. If a subspace drive is damaged, there is no roll to destroy the ship as in B5W. Rather a damage subspace drive only rolls to see if it works or not. If the roll fails, the drive is jump fails and the drive is considered destroyed (mark off all boxes). Subspace drives also have different properties. A ship may use these drives anywhere to jump to any point within the same system, but inter-system jumps can only take place at specific points in known as jump nodes. This makes blockades a much more viable option. If a battle takes place near to node, simply designate one hex as being the node point. The node has no physical representation (ie, it cannot be destroyed except for VERY scenario-specific circumstances). |
Reactor Redundancy: Some enormous warships are equipped with multiple reactors, these represent the additional redundancy that a larger ship would afford. Unlike multiple reactors found on bases, the reactors are often congregated into one section and labelled for their respective workloads. Unlike standard B5Wars reactors, neither the ship nor the section is destroyed when one of the reactors is lost to enemy fire. Instead, consult the power chart on the SCS, for each reactor, is shown the total power produced by that reactor. When the reactor is destroyed, apply a power deficit equal to its value to the ship in question. The loss, or application of criticals to this reactor cannot exceed this value. So if a reactor produces 15 points of power, and has taken -12 power worth of criticals, if the reactor is destroyed the net loss is still only -15. Furthermore, if that same reactor takes another -8, the net loss is only considered to be -15. These reactors are never subject to reactor meltdowns or explosions, should such a roll be neccesitated by the critical chart, the reactor is instead automatically shutdown. Once a ship looses ALL of its reactors, it is destroyed in the fashion similar to standard reactor destruction. Finally, if one section's reactor is destroyed, power may still be diverted to that section from other reactors. The main downside of a destroyed reactor is the automatic power deficit. |
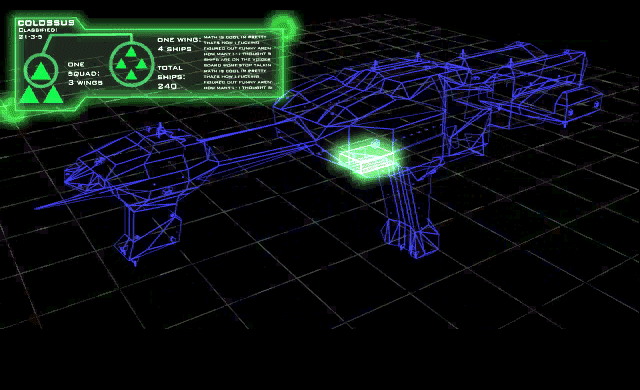
Optional Super-Capital Rules: Ships such as the Lucifer, Sathans or Colossus (FS2) are very sluggish vessels, evidenced by their high turn costs and large turn delays. To better simulate this, one may adopt a rule specifying that such large ships are only capable of turning one hexside per turn. This is suggested to prevent such large ships from spinning in place like a top at speed 0. I would hope that many people would not resort to such tactics, but I know there are some people who have more faith in rules than flavour and this rule is suggested for their benefit (or more accurately, their opponents'). |
Limited Sensors First born for my Tolkid/Rawnjok War ships, limited sensors is a new rule to prevent inordinate sensor-pumping by ships with large power reserves. The rules are identical to those of overthrusting, should a player choose to increase his/her sensor value, at the end of the turn they are required to roll a critical adding X to the roll, where X is equal to the total increase in sensor value. So if a player increases a sensor from 7 to 9, at the end of the turn they would roll a critical with a +2 modifier. This in part is also in effect to help promote fighters as the main combatants. |